Pages

Friday, September 29, 2006

obese

Malaysia has the most number of fat people in the Asean region. In fact, the number of fat people here exceeds that in many developed countries, including Germany and France.

In the last 10 years, the number of fat people has more than doubled, resulting in more Malaysians falling ill and diseases such as hypertension and diabetes shooting up.

A survey shows that 54 per cent of the adult population is either obese or overweight. Ten years ago, it was only 24.1 per cent.

I read that from the Malaysian newspaper. Surprised to know that.

read more here
Narrated Abu Huraira:

The Prophet said, "Whoever does not give up forged speech and evil actions, Allah is not in need of his leaving his food and drink (i.e. Allah will not accept his fasting.)"

[Sahih Bukhari 31: 127]

Wednesday, September 27, 2006

sahabat....

"friends forever"....seringkali dengar ungkapan itu namun sejauh manakah kenyataan itu menjadi realiti? Sudah lebih daripada 20 tahun hidup di dunia ini, namun agak sukar untuk mencari sahabat yang kekal di sisi kita. Sahabat satu sekolah, satu universiti, satu daerah dan pelbagai persamaan lagi....berapa ramaikah yang masih kekal berhubungan sehingga kini? Betapa ramai manusia kita bersahabat, namun jarang yang kekal selama-lamanya. Atas dasar apakah yang mampu mengekalkan nilai suatu persahabatan? adakah kerana kita mempunyai banyak persamaan atau adakah kerana kita mempunyai perbezaan? Seringkali persahabatan itu wujud kerana ada persamaan antara dua pihak. Kita berkawan kerana dia satu kolej dengan kita. Pernah belajar bersama-sama, pernah mengharungi suka-duka dan memahami hati kita. Namun mampukah persahabatan itu kekal sehingga akhir hayat?

Monday, September 25, 2006

chess

I have been playing this game for few days now. Chess. Playing against computer. Hard and after countless loss, I am able to pick up few survival moves ;). Now, I can survive a bit longer. Afterall, I'm not a good chess player. I usually made my move at random and rarely think 2-3 steps ahead. I guess I have to be more serious the next time I play against computer.

This chess game is free. The size is roughly about 1.3 mB. To download it, click here

p/s: in the picture above, I am white. The computer managed to beat me again ;)

Friday, September 22, 2006

One Web Day.

One Web. One World. One Wish.

Today is the day we celebrate the existence of world wide web.


Without the world wide web, just imagine how dull your life are going to be? No email, no chatting, no online knowledge and nothing to bridge the gap between any persons or countries. Just imagine how long it will take via post (air, sea etc) just to send an important message to another person across the world. In the world of internet, the message will only take seconds to reach that person via instant messenger.

If you would like to know about something, the fastest way is to google it instead of finding the same information from any books in the library. In fact, the phrase 'google' is the common verb now ;).

for more info, click here


Wednesday, September 20, 2006


Who is better in speech than one who calls (men) to Allah, works righteousness, and says, "I am of those who bow in Islam"?

Nor can goodness and Evil be equal. Repel (Evil) with what is better: Then will he between whom and thee was hatred become as it were thy friend and intimate!

And no one will be granted such goodness except those who exercise patience and self-restraint,- none but persons of the greatest good fortune.

And if (at any time) an incitement to discord is made to thee by the Evil One, seek refuge in Allah. He is the One Who hears and knows all things.

(Fussilat : 33-36)

Tuesday, September 19, 2006

Google Analytics

I has been using Google Analytics for few weeks now. It is a great service and quite thorough. The most complete version of its kind.

What it is? Well, it is some sort of website tracker which collect all the statistics involved while surfing any website. It is not just useful for normal blogger user but it can also be used for larger audience such as big marketing company. I am interested to see that it is able to detect and create the pathway involved in browsing a large website (if you have one). Useful for company executive, marketing department and web developer :).

The only downside is that it is a little bit complicated at first. Hopefully they are able to improve on the interface in the future.

Google Analytic slide show

Monday, September 18, 2006

antara dua cinta

Apa yang ada jarang disyukuri
Apa yang tiada sering dirisaukan
Nikmat yang dikecap baru kan terasa bila hilang
Apa yang diburu timbul rasa jemu
Bila sudah di dalam genggaman

Dunia ibarat air laut
Diminum hanya menambah haus
Nafsu bagaikan fatamorgana
Di padang pasir

Panas yang membahang disangka air
Dunia dan nafsu bagai bayang-bayang
Dilihat ada...ditangkap hilang

Tuhan...leraikanlah dunia
Yang mendiam di dalam hatiku
Kerana di situ tidak kumampu
Mengumpul dua cinta
Hanya cintaMu kuharap tumbuh
Dibajai bangkai dunia yang kubunuh

-Raihan-
Tertarik dengan ayat ini....Apa yang diburu timbul rasa jemu, Bila sudah di dalam genggaman...

Adalah biasa untuk kita mengalami hal sedemikian. Apabila hati ini menjumpai akan sesuatu yang menarik dan hebat, lantas kita membentuk satu azam untuk berusaha mencapainya. Biarlah usaha itu menghadapi rintangan dan dugaan atau merentasi masa yang panjang, azam kita yang kukuh akan sanggup mengharunginya. Itulah lumrah kehidupan ini.

Cubalah kita renungkan kembali kehidupan silam kita. Sudah pasti ada beberapa perkara yang dahulu kita idamkan sudah kita capai sekarang. Katakanlah seorang pelajar yang bakal menduduki peperiksaan SPM. SPM ini bakal menentukan masa hadapan dan dia tidak dapat membayangkan kehidupannya andainya dia gagal SPM ini. Sudah tentu pelajar ini akan berusaha sedaya-upaya. Tak kira waktu, tak kira tenaga...dia akan berusaha sedaya-upaya demi mencapai suatu keputusan yang bakal meletakkan kehidupan masa depannya pada kedudukan yang selesa. Keputusan SPM yang cemerlang...itulah azam dan harapan dia. Itulah azamnya yang tetap teguh di hati.

Katakanlah pelajar itu berjaya dengan gemilangnya. 20 tahun selepas itu, sudah pasti pelajar itu sudah bekerja dan berumahtangga. Kehidupannya pasti akan bahagia. Namun, adakah pemikiran pelajar itu masih beranggapan bahawa SPM itu masih penting lagi? Atau adakah dia akan memikirkan perkara lain sebagai matlamat kehidupannya?

Kehidupan ini seringkali berubah-ubah dan begitulah juga hati ini. Matlamat kita akan berubah mengikut suasana dan tahap pemikiran dan pemahaman kita terhadap sesuatu. Maka renungkanlah rangkap yang seterusnya.

Dunia ibarat air laut
Diminum hanya menambah haus
Nafsu bagaikan fatamorgana
Di padang pasir

Hayatilah maksud rangkap ini dengan mendalam. Semoga ini bakal menjadi suatu panduan untuk kita memahami rentak-rentak kehidupan yang singkat ini.


nights and days

It is Allah Who has made the Night for you, that ye may rest therein, and the days as that which helps (you) to see. Verily Allah is full of Grace and Bounty to men: yet most men give no thanks.

(Al-Ghafir : 61)

Friday, September 15, 2006

new header

New header again B). This time the picture is 3D. Check the original picture on your right.

Thursday, September 14, 2006

HbA1c

Since I am not that busy at the moment, I spend sometime to understand few biochemical procedures involved in managing diabetes. All diabetic patients nowadays are managed by measuring their blood glucose and for long term management, their blood glucose are measured in term of HbA1c.

Everytime I went to the diabetes clinic, all the children with diabetes will go to the nurse and the nurse will prick their fingers to take sample of their blood. HbA1c is part of the red blood cells and people with diabetes have slightly higher proportion of HbA1c. The more glucose they have in the blood, the more glucose stick to the blood cells (HbA1c) and the lifespan of these blood cells is about 3 months. Thus, by measuring HbA1c, you actually measure the average of 3-months blood glucose :)

Now, the process involved in measuring HbA1c can be either high-pressure cation-exchange chromatography, electrophoresis or immunoturbidometric methods. I know the concept of electrophoresis but not the other two procedures. Google them up and read the procedures. Interesting :).

Nevertheless, if someone offer me to do research something to do with lab, most probably I reject it :). Spending hours after hours in the lab is not something that I like.

english test

I read in the Australian newspaper that Howard's government will implement a new plan that requires all the new citizens to take English test. And to be an Australian citizen, they have to pass that test.

This kind of language test should be done at Malaysia too. Can you imagine how many of those immigrants who are not able to speak in Malay? Just imagine how much you lost if you are not able to communicate in native language. It is impossible for someone to become entirely dependent to other people as their interpreter.

Sunday, September 10, 2006

finish

Alhamdulilah, finally managed to finish editing the entire database. There are few data which are missing and need to be follow up.

the promise


O men! Certainly the promise of Allah is true. Let not then this present life deceive you, nor let the Chief Deceiver deceive you about Allah.

Verily Satan is an enemy to you: so treat him as an enemy. He only invites his adherents, that they may become Companions of the Blazing Fire.

For those who reject Allah, is a terrible Penalty: but for those who believe and work righteous deeds, is Forgiveness, and a magnificent Reward.

[Fatir : 5-7]

Friday, September 08, 2006

database

will be busy for the next few days. I need to check and update my entire database. The number of entry (patients) is already more than 160.


Wednesday, September 06, 2006

strangers

While waiting for the consultant today, a small boy came near me and sat down. I guess he is around 5 years old. I thought he want to drink some water since he was quite close to the water filter...

He told me that he does not want any drink. OK.

Then, I turned around to check for the consultants. Within minutes, his face turned bright red and he closed his face with his small hand. He cried and cried continuously. I'm surprised and I don't think I do anything wrong.

Few nurses nearby started to notice him. One nurse asked him and he told us that he could not find his mum and dad and sister. The nurse asked his surname. He quickly told us while he was still crying. Fortunately, the consultant that I am waiting for was interviewing his family :).

Imagine you are a little kid and surrounded by adults. You are small and the adults are biger than you. You don't know anyone of them. All of them are strangers. Aren't you afraid? I understand why that little boy cried. Being surrounded by strangers certainly give us that kind of fear especially if the physical size differ very much.

That little boy reminded me of my childhood and my little brothers and sisters. Doing research among children certainly give me that kind of feeling every time I meet them. What a day :)


Monday, September 04, 2006

no more 'Crocodile Hunter'...

A DOCTOR has told of the desperate efforts to save Australian icon Steve Irwin after the Crocodile Hunter was struck in the chest by a stingray barb today.

Irwin, 44, died this morning after being fatally injured while filming a nature documentary off Queensland.

The news has shocked the nation and prompted a rush of tributes from politicians and the public alike.

Irwin's wife Terri was in Tasmania at the time of the tragedy and had to be contacted by police with the terrible news.

Dr Ed O'Loughlin was aboard the Emergency Management Queensland Helicopter which was called from Cairns at 11.21am (AEST).

Irwin was being given CPR at Low Isles, off Port Douglas, as the helicopter arrived less than one hour after the incident, but Dr O'Loughlin said nothing could be done to save him.

"It became clear fairly soon that he had non-survivable injuries," Dr O'Loughlin said.

"He had a penetrating injury to the left front of his chest.

"He had lost his pulse and wasn't breathing."

read more.

Sunday, September 03, 2006

Photoshop tutorial: Pattern 2

The next part of this tutorial will discuss on how to apply the new pattern you have made into a blog. This tutorial will involve Photoshop and some knowledge on CSS (Cascade Style Sheet).

Before applying the new pattern, we need to discuss the properties of a typical blog. The picture below shows the main section of a blog. This layout is based on my blog. As you could have seen, there are several sections such as body, base, header, main, sidebar and footer.

The new pattern can be filled into any of these section and for this, you need to know the width of the section that you are going to apply the new pattern. In this blog, I have used the pattern in Base which have the width of 800 pixels. You could have used the pattern in Main which have the width of 500 pixels.
[This measurement is based on my own blog. Thus, the exact width may be differ from your own website]
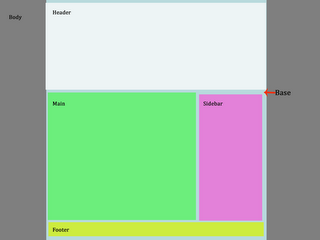
It is important to know the exact width as this have important consequence later :). Let say you are going to fill the Base which have the width of 800 pixels.

1. Create a new image 800 x 20 pixels with transparent background.
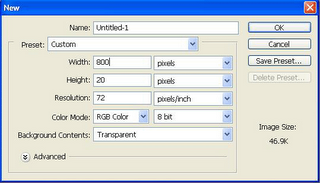
2. Next, choose fill tools and click pattern. Check the picture for clearer instruction.
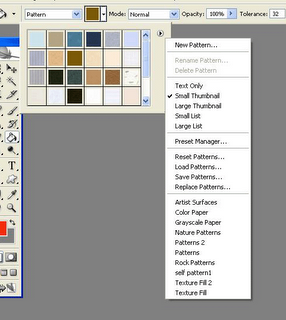
3. Usually, the new pattern that you have made will be there. I would like to show you the other options of Pattern tools. Usually I saved all my new patterns under the category of self pattern 1.
If you have created several patterns, it is a better technique to save all those patterns under a new category. By saving under one name, it will help you to transfer your own pattern in case you have to reformat your computer or if you have to reinstall Photoshop.
If you click Reset Patterns, Photoshop will replace the current pattern with the default pattern. Choosing Save Patterns allow you to save the new pattern under a new name. By clicking any categories of the pattern such as Artist Surfaces, Color Paper etc, you can replace the current pattern with a new category. In my case, I need to click Self Pattern 1 as this is the category for all the new pattern that I have made previously :).

4. Next, choose the new pattern that you have made.
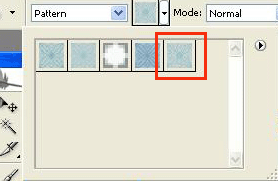
5. Now, choose the Fill tools again and choose fill Pattern with the following options. Check the picture :).
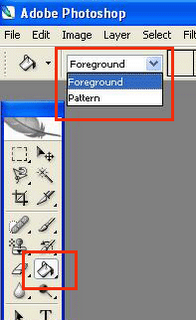
[If you could not found the Fill tools ie Paint Bucket picture, right click on the small black triangle. Remember that there are hidden tools as indicated by the small black triangle ;)]
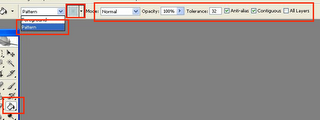
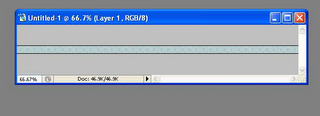
6. Now, the mouse will become a Paint Bucket. Click the empty area on the image and the new pattern will fill the entire image. The image now should look something like this...
7. Now, click File / Save for Web ...and just click save and rename the file :). The new picture will be saved in the format of gif. Saving a picture as .gif reduce the size (and the quality too) of the picture and enhance the speed of viewing your website.
[All the pictures of these two tutorials are in the form of gif. Hence you might notice the low quality but faster speed of viewing the pictures]
8. Now, you should have an image that has been filled with the new pattern. Next, you need to upload the new picture into any website that can hosts the picture. You can use Blogger since they provide the option to upload the picture. Please remember the url of the picture ;). The final image will be looking like this. Since the pattern is the same as my background, probably you cannot see the exact picture. Try to click somewhere below this sentence :D

9. Now, this is the tricky part where you need to know a bit about CSS :). Remember that what I have said about the width. By creating a picture with 800 pixels width, the picture now can fill the entire Base section. But the picture is only 20 pixels in height. So, how do you manage to fill the entire section with the same picture?

Please check your CSS of your website and find the location of the section that you want to fill with the pattern. In my case, I need to find '.base'.

Now, type this under .base...
background: url('yourpicturelocation') repeat-y;
The trick here is 'repeat-y'. By writing this, the picture will be repeated along the y-axis (vertical) and thus fill the entire section till the bottom of the website. If you write 'repeat-x', the picture will be repeated along the x-axis and you can fill horizontally.

An example is shown below

.base {
margin: auto;
background: url('http://photos1.blogger.com/blogger/1708/517/1600/wrapper.0.gif') repeat-y;
width: 800px;

10. Now, having done that, you need to make sure that all the other sections do not have the properties of background or colours in their CSS. If they have those properties, your pattern in .base may be hidden behind .main, .sidebar, .header etc. Let me know if this sound too confusing :)

11. Hopefully, you can manage to do the previous step :). If you have any problem, feel free to leave your question in the comment box.

Beside doing pattern for your website, the picture below shows few examples on how you could use pattern.
For more photoshop tutorials, you can either click the link under Photoshop reference on your right or click here.

Friday, September 01, 2006

Photoshop tutorial: Pattern 1

I have been designing my own blog for the past two years. The current template was created using Frontpage 2003 and Photoshop CS2. The background of this blog is filled with a pattern that I created using Photoshop. Having pattern as your background make your website more interesting and it is a better alternative than using only colours to fill the background.

In this post, I will try my best to explain the steps involved in creating and managing your own pattern in Photoshop :). This tutorial will be quite lengthy as it is my intention to wrote this tutorial for the beginners. If the picture are not clear, please click for larger picture ;).

The objective of this tutorial is to create the image as shown below.

This tutorial will explain how to use custom shape as a pattern and save the new pattern in Photoshop.
  1. Create a new file with size 20 x 20 pixel and make it transparent.
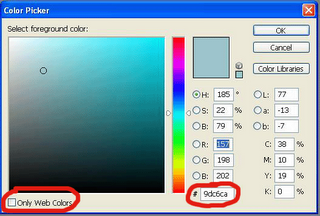
  2. Next, choose your forecolours. Check the picture below. Double click the black box.
    [Note that the black box represent your foreground colour and the white box represent the background colour. It may not be the same colour depending on the previous colours you used in the past]
  3. A new dialog box will appear and ask you to choose the colour. Make sure you do not click the box 'Only Web Colors' and put in 9dc6ca as your foreground colour.
    [For the purpose of this tutorial, the pattern that will be created is based on this blog. Thus the colour chosen will be the same as mine :)]
    With the same technique, choose your background colour by clicking the white box instead of the black box. Put c5d1d0 as your background colour.
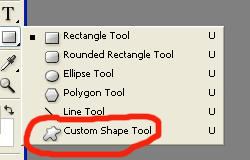
  4. Next, you need to choose custom shape tool.
    [Custom shape tool give you the ability to choose various shapes that are available in the photoshop]
    Check the red arrow on the picture below. The picture shows the location of custom shape tool but at the moment it is hidden.
    [In the Tools, there are more options shown but most of them are hidden. Can you see the small black triangle at the bottom right of the square? The small black triangle indicate there are hidden tools. If you check the rest of the tools, there are a lot of those small black triangle. Give it a try to check what kind of tools are available :)]
    The square shown in the picture represent the rectangular tool. Right click at the square....
  5. And, a dialog box will appear. Click custom shape tool as shown below.
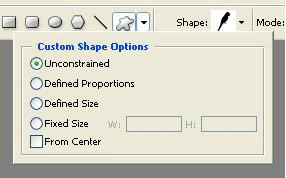
  6. Next, a new option will appear at the top of the window. Click as shown in the red box.
    [Everytime you click any tools, there will appear a new option on the top of the window. It is not exactly top though, the option will appear below standard toolbar {File Edit Image Layer etc}]
  7. Next, click the small black down arrow as shown in right red box. Choose unconstrained.
  8. Next, we need to choose the custom shape that we would like to use. First, click the black down arrow next to the black bird (The image may be differ from yours depending on the last shape you used). A new box will appear. Click the down arrow as shown in the picture below. Then, choose Ornaments.
    [This step shows how you can replace and choose any custom shape available in Photoshop. There are few categories available]
    A dialog box will appear and ask you whether you want to replace the current shape with ornament.csh.
    [If you click ok, the Ornament shape will replace the current shape and by clicking append, it will add ornament shape to the current one.]
    Click OK.
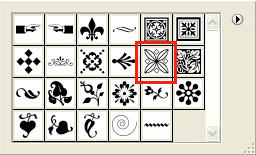
  9. Next, choose this shape :)
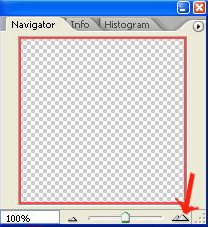
  10. Since the file is only 20 x 20 pixel, we need to zoom in before applying the ornament shape. So, find the navigator tools on your top left and click as shown by the red arrow. Click it until you reach 600%.
    [The navigator tool is an important tool. If you zoom out and want to move to another part of the image, the easiest way is to drag the red box in the navigator tool]
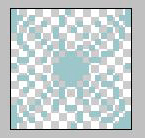
  11. After zoom in the image, apply the shape. Drag your mouse from top-left corner of the image to the bottom right corner. Make sure the ornament fit the whole box. The image should look like this...
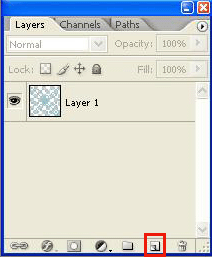
  12. Next, we need to create a new layer. Go to the layer tool on bottom right corner and click the symbol as shown in the red box.
    [The symbol is a shortcut to create a new layer. Tips: if you drag layer 1 to that symbol, a duplicate layer will be created. If you drag any layer to the dustbin ie the symbol on the right, the layer will be deleted]
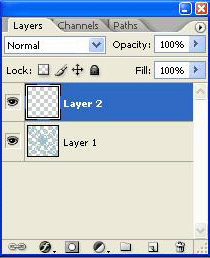
  13. A new layer will be created. Layer 2.
  14. Next, we need to change the foreground colour to the background colour. Go the foreground tool and click the arrow as shown in the picture. This will change your background colour into foreground. The foreground colour now should be lighter than the background.
  15. Make sure you have clicked layer 2. Now, choose fill tool and choose fill foreground as shown in the picture.
  16. The mouse now should change into a paint bucket. Click the mouse on the empty area of the image and the foreground colour should fill the entire image.
  17. If everything is right, the workspace should look like this.
  18. Now, we need to move layer 2. Drag layer 2 below layer 1 and now it should look like this.
  19. The image should be looking something like this now...
The final step is to save this image as a new pattern. Click Edit / Define pattern / and put whatever name you like.

Next tutorial will explain on how to apply this pattern such that it can be put into as background of the blog :)


tute

Currently involved in writing a photoshop tutorial :).